Creating your image overlay or frame (aka watermark or logo)
Once an Image Overlay is added to a Campaign, those graphics will be added to all uploaded images, whether the image is a photo, GIF, boomerang, or video and whether it was uploaded from any source: Fotozap Booth, Fotozap Camera, Fotozap DSLR, and other sources. The Overlay will also appear in the viewfinder of the app as you are shooting.
Here are the basics of creating an overlay.
- Overlays should be in .PNG file format with transparency
- Overlays should always be 1280 pixels wide.
- The overlay is positioned at the bottom of the uploaded image. This means that if the overlay is 1280 pixels wide and only 300 pixels tall, the overlay will be a strip covering the bottom 300 pixels of the image.
How to Create a Full Frame Overlay
Instead of just covering the bottom of the photo, or bottom corner, you can create a full frame overlay that has graphics along all the edges.
The overlay dimensions must take into account both the Aspect Ratio and the Image Orientation (Landscape or Portrait).
Both of these settings can be locked in on the Admin Site in Customize > [campaign name] > Image Overlay.
Once you have decided the Aspect Ratio and Orientation, use the pixel dimensions in the table below to design your .PNG overlay.
Use the links in the table to download .PNG or Photoshop (.PSD) templates:
As you will note, the overlay is always 1280 pixels wide, and then the height will vary depending on how much of the image you want to cover and the height of the captured image.
If any part of the overlay is outside of the captured image (for example, if you load a 1280 x 1707 Portrait overlay, but then capture a 1280 x960 Landscape photo, the top part of the overlay will simply not appear.
You can see some examples below:
Here is a semi-transparent overlay that runs along the bottom of the uploaded image.
This type of overlay that runs along the bottom can work on captured images of any Aspect Ratio and Orientation:

Here is that actual overlay at full size (1280x960 pixel PNG). Click to open the overlay in a new window and right-click to save it:

This 1280 x 1707 overlay covers all four sides of the photo. You would want to make sure you click to lock the orientation to Portrait only on the Image Overlay tab.
Click to open in a new tab, then right-click to download.

Another Example with the same specifications:

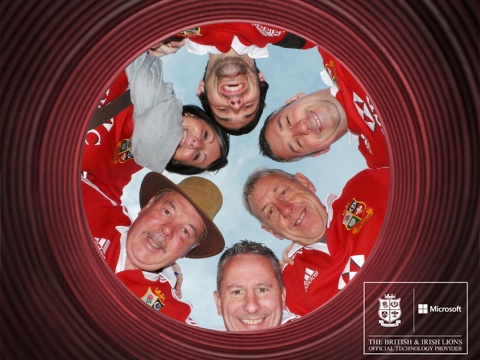
Another full frame overlay in the shape of a circle. By combining an overlay with a creative shooting angle, you can create interesting effects.
| Aspect Ratio | Landscape | Portrait |
| 4 : 3 | 1280 wide x 960 tall
Template: PNG or PSD |
1280 wide x 1707 tall
Template: PNG or PSD |
| 3: 2 (4x6 print) | 1280 wide x 853 tall
Template: PNG or PSD |
1280 wide x 1920 tall
Template: PNG or PSD |
| 1:1 Square | 1280 wide x 1280 tall
Template: PNG or PSD |
|
| 5 : 4 (8x10 print) | 1280 wide x 1024 tall
Template: PNG or PSD |
1280 wide x 1600 tall
Template: PNG or PSD |
| 7 : 5 (5x7 print) | 1280 wide x 914 tall
Template: PNG or PSD |
1280 wide x 1792 tall
Template: PNG or PSD |
| 16 : 9 | 1280 wide x 720 tall
Template: PNG or PSD |
1280 wide x 2276 tall
Template: PNG or PSD |
If any part of the overlay is outside of the captured image (for example, if you load a 1280 x 1707 Portrait overlay, but then capture a 1280 x960 Landscape photo, the top part of the overlay will simply not appear.
You can see some examples below:
4 : 3 Landscape Overlay Example
Here is a semi-transparent overlay that runs along the bottom of the uploaded image.
This type of overlay that runs along the bottom can work on captured images of any Aspect Ratio and Orientation:
Here is that actual overlay at full size (1280x960 pixel PNG). Click to open the overlay in a new window and right-click to save it:
3 : 4 Portrait Full Frame Overlay Example
This 1280 x 1707 overlay covers all four sides of the photo. You would want to make sure you click to lock the orientation to Portrait only on the Image Overlay tab.
Click to open in a new tab, then right-click to download.
Another Example with the same specifications:
Another full frame overlay in the shape of a circle. By combining an overlay with a creative shooting angle, you can create interesting effects.